3D virtual assistant SDK that enables you to make your 3D model into a voice-enabled chatbot. 🇯🇵日本語のREADMEはこちら
- 🇬🇧 Live demo English Say "Hello" to start conversation. This demo just returns what you say (echo).
- 🇯🇵 Live demo in Japanese「こんにちは」と話しかけると会話がスタートします。会話がスタートしたら、雑談に加えて「東京の天気は?」などと聞くと天気予報を教えてくれます。
-
3D Model
- Speech and motion synchronization
- Face expression control
- Blink and lipsync
-
Dialog
- Speech-to-Text and Text-to-Speech (Azure, Google, Watson etc)
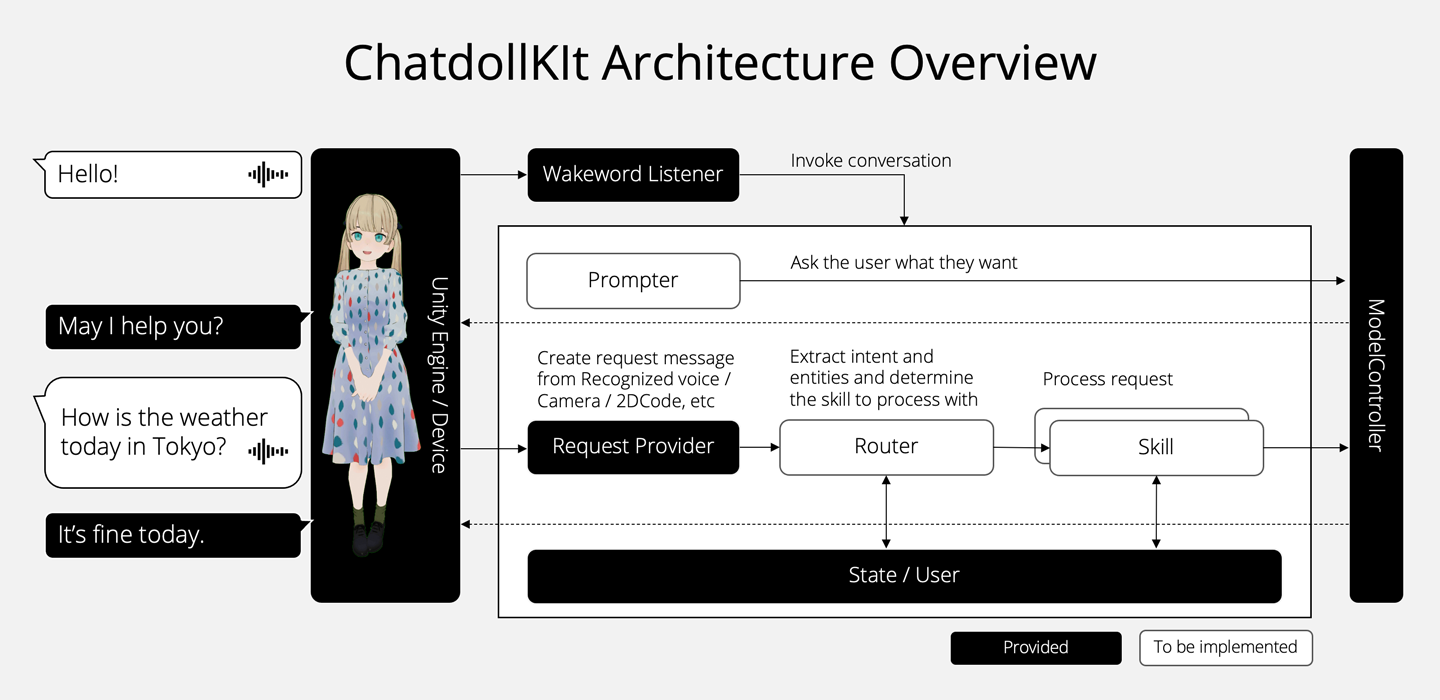
- Dialog state management
- Intent extraction and topic routing
- ChatGPT with emotion engine
-
I/O
- Wakeword
- Camera and QR Code
-
Platforms
- Windows / Mac / Linux / iOS / Android and anywhere Unity supports
- VR / AR / WebGL / Gatebox
... and more! See ChatdollKit Documentation to learn details.
You can learn how to setup ChatdollKit by watching this 2 minutes video: https://www.youtube.com/watch?v=aJ0iDZ0o4Es
Download the latest version of ChatdollKit.unitypackage and import it into your Unity project after import dependencies;
Burstfrom Unity Package Manager (Window > Package Manager)- UniTask(Ver.2.3.1)
- uLipSync(v2.6.1)
- For VRM model: UniVRM(v0.89.0) and VRM Extension
- For Unity 2019 or ealier: JSON.NET For Unity from Package Manager ([email protected])
Add 3D model to the scene and adjust as you like. Also install required resources for the 3D model like shaders etc. In this README, I use Cygnet-chan that we can perchase at Booth. https://booth.pm/ja/items/1870320
And, import animation clips. In this README, I use Anime Girls Idle Animations Free. I believe it is worth for you to purchase the pro edition👍
Put ChatdollKit/Prefabs/ChatdollKit or ChatdollKit/Prefabs/ChatdollKitVRM to the scene. And, create EventSystem to use UI components.
Select Setup ModelController in the context menu of ModelController. If NOT VRM, make sure that shapekey for blink to Blink Blend Shape Name is set after setup. If not correct or blank, set it manually.
Select Setup Animator in the context menu of ModelController and select the folder that contains animation clips or their parent folder. In this case put animation clips in 01_Idles and 03_Others onto Base Layer for override blending, 02_Layers onto Additive Layer for additive blending.
Next, see the Base Layer of newly created AnimatorController in the folder you selected. Confirm the value for transition to the state you want to set it for idle animation.
Lastly, set the value to Idle Animation Value on the inspector of ModelController.
On the inspector of DialogController, set Wake Word to start conversation (e.g. hello / こんにちは🇯🇵), Cancel Word to stop comversation (e.g. end / おしまい🇯🇵), Prompt Voice to require voice request from user (e.g. what's up? / どうしたの?🇯🇵).
Select the speech service (Azure/Google/Watson) you use and set API key and some properties like Region and BaseUrl on inspector of ChatdollKit.
Attach Examples/Echo/Skills/EchoSkill to ChatdollKit. This is a skill for justs echo. Or, attach Examples/ChatGPT/Skills/ChatGPTSkill and set OpenAI API Key if you want to enjoy conversation with AI😊
Select Setup VRC FaceExpression Proxy in the context menu of VRC FaceExpression Proxy. Neutral, Joy, Angry, Sorrow and Fun face expression with all zero value and Blink face with blend shape for blink = 100.0f are automatically created.
You can edit shape keys by editing Face Clip Configuration directly or by capturing on inspector of VRCFaceExpressionProxy.
Press Play button of Unity editor. You can see the model starts with idling animation and blinking.
- Say the word you set to
Wake Wordon inspector (e.g. hello / こんにちは🇯🇵) - Your model will reply the word you set to
Prompt Voiceon inspector (e.g. what's up? / どうしたの?🇯🇵) - Say something you want to echo like "Hello world!"
- Your model will reply "Hello world"
See the MultiSkills example. That is more rich application including:
- Dialog Routing:
Routeris an example of how to decide the topic user want to talk - Processing dialog:
TranslateDialogis an example that shows how to process dialog
We are now preparing contents to create more rich virtual assistant using ChatdollKit.
Refer to the following tips for now. We are preparing demo for WebGL.
- It takes 5-10 minutes to build. (It depends on machine spec)
- Very hard to debug. Error message doesn't show the stacktrace:
To use dlopen, you need to use Emscripten’s linking support, see https://github.com/kripken/emscripten/wiki/Linking - Built-in Async/Await doesn't work (app stops at
await) because JavaScript doesn't support threading. Use UniTask instead. - CORS required for HTTP requests.
- Microphone is not supported. Use
ChatdollMicrophonethat is compatible with WebGL. - Compressed audio formats like MP3 are not supported. Use WAV in TTS Loaders.
- OVRLipSync is not supported. Use uLipSync and uLipSyncWebGL instead.
- If you want to show multibyte characters in message window put the font that includes multibyte characters to your project and set it to message windows.


